Unity Face Animaton V2
A downloadable game for Windows and Linux
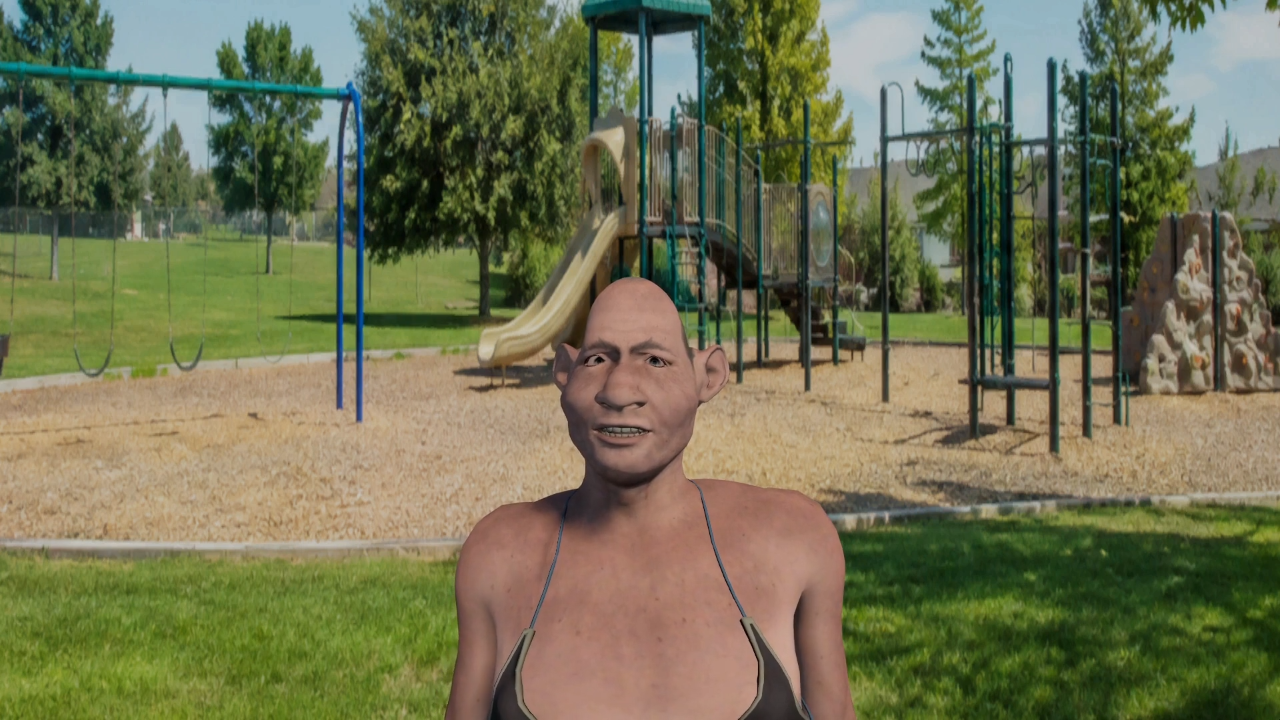
Mumin Face Animation V2 – Complete Setup & Usage Guide
This guide shows you how to prepare a character, create lip-sync blendshapes, rig the character with Mixamo, import everything into Unity, and set up:
- Automatic lip sync
- Speech and singing
- Automatic blinking
- Eye tracking / looking around
- Facial emotions
- Mixamo body animations
Everything runs locally. You do not need to know how to use Blender manually.
1. What You Need
Before starting, install:
- Unity 6
- Blender
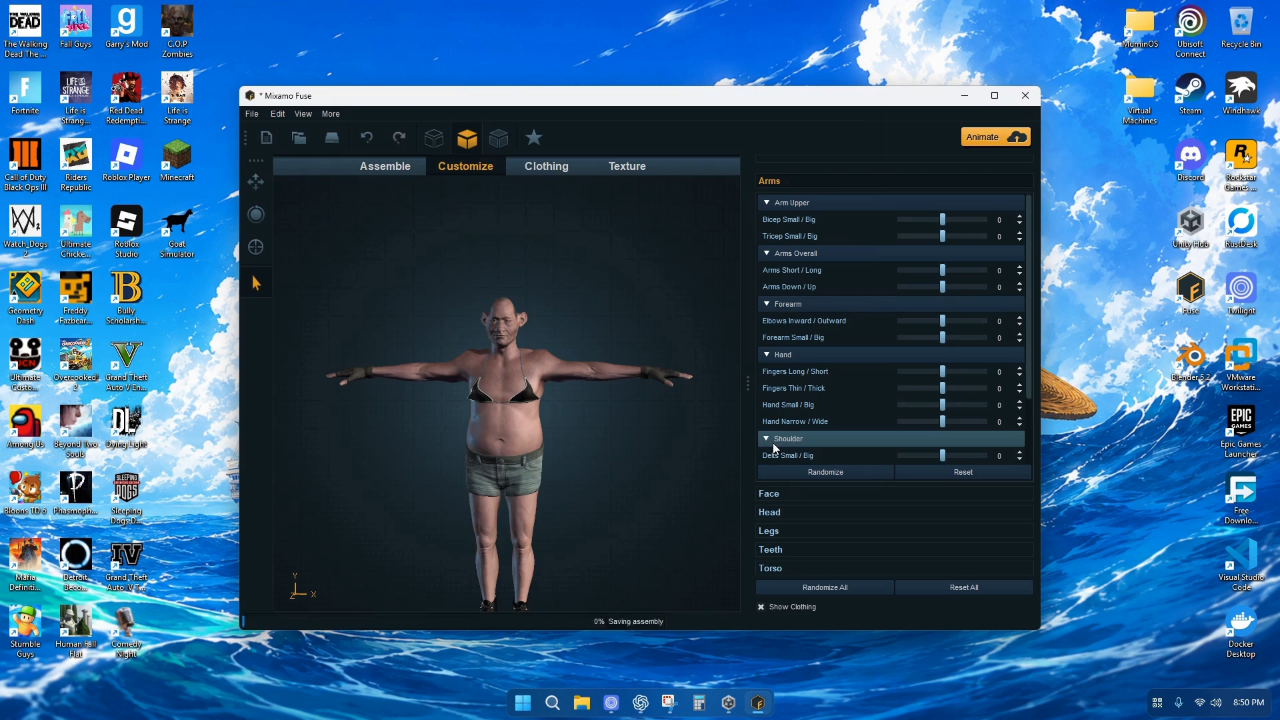
- A character with facial-expression meshes
- Mumin Character Compiler
- Unity Face Animation V2 By Mumin Amir
The Unity package was designed for Unity 6 and tested with Unity 6000.5.8f1.
The high-accuracy automatic speech recognition included with the package runs on Windows.
2. Prepare Your Character
If your character already has the required blendshapes, you can skip to Section 6 – Import Into Unity.
Otherwise, use the Mumin Character Compiler.
Create one folder for your character.
Example:
MyCharacter/
Put the neutral version of the character inside and name it:
base.obj
or:
base.fbx
The following also work:
00_Base.obj 00_Base.fbx
The base must be the completely neutral version of the character.
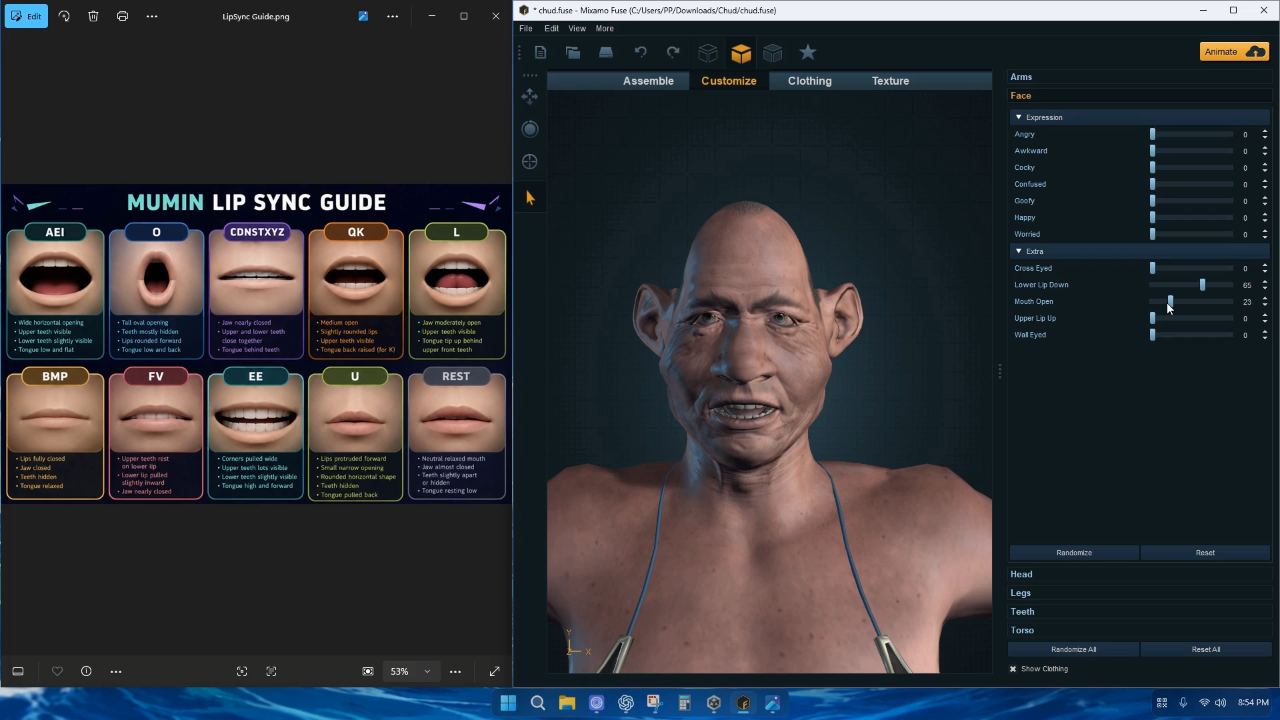
3. Create the Lip-Sync Expressions
Export copies of the exact same character using the same export settings.
Only change the facial expression.
For the easiest automatic setup in Unity, use these filenames:
base.obj aei.obj o.obj cde.obj gk.obj l.obj bmp.obj fv.obj ee.obj u.obj
You can also include other expressions such as:
blinkBody.obj happyBody.obj angryBody.obj sadBody.obj worriedBody.obj surprisedBody.obj
The filename becomes the blendshape name in the finished character.
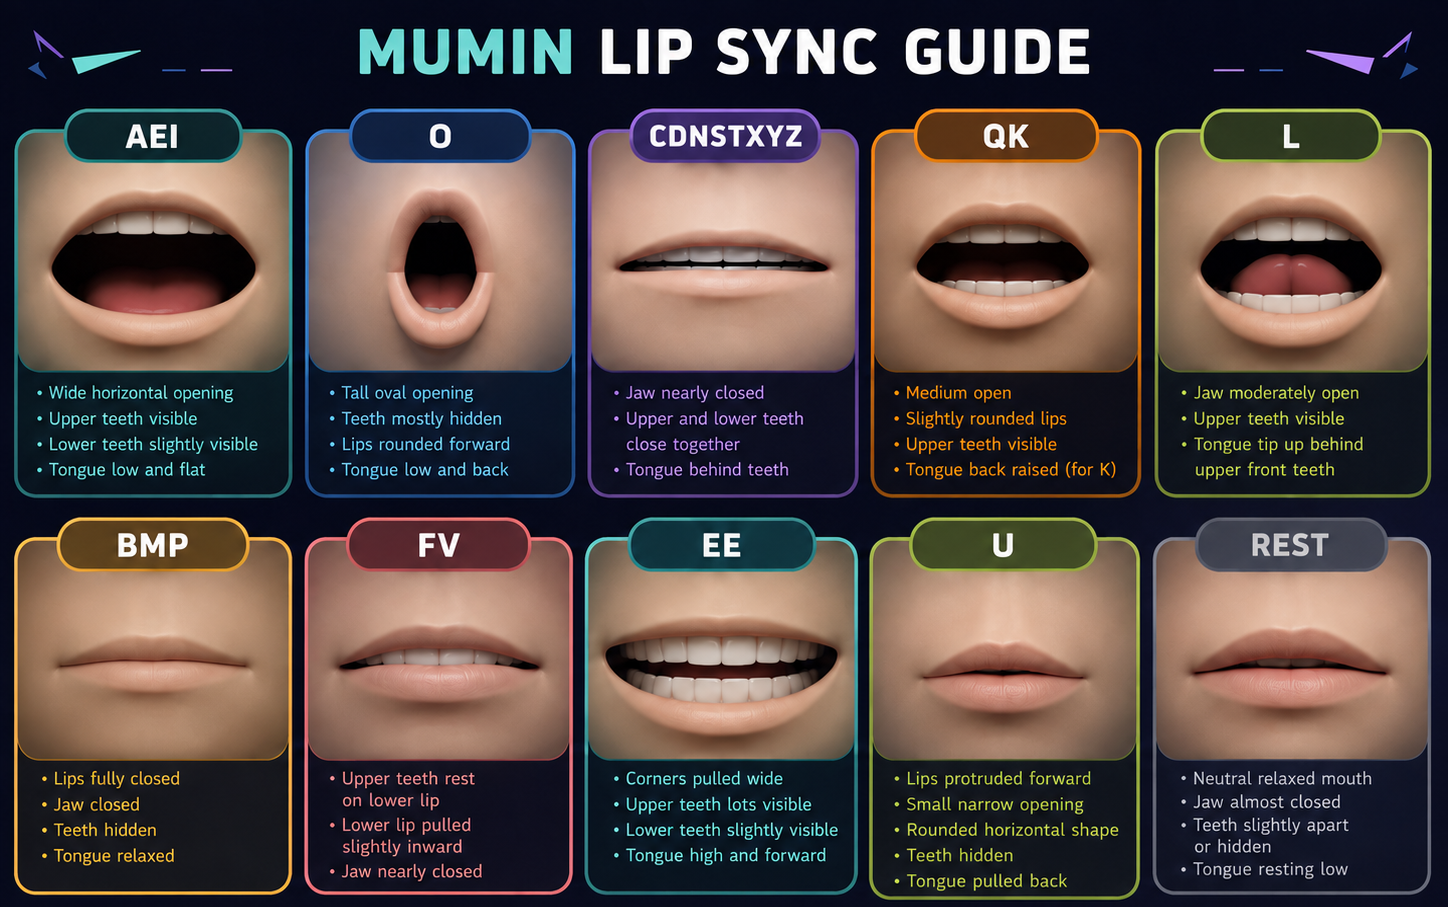
Recommended Lip-Sync Shapes
AEI → aei
Used for sounds such as A, E and I.
The mouth should have:
- Wide horizontal opening
- Medium jaw opening
- Upper teeth visible
- Lower teeth slightly visible
- Tongue low and relatively flat
O → o
Used for O-type sounds.
The mouth should have:
- Tall oval opening
- Rounded lips
- Teeth mostly hidden
- Tongue low and toward the back
CDNSTXYZ → cde
Used for many closed or narrow consonant sounds.
The mouth should have:
- Jaw almost closed
- Small horizontal mouth opening
- Upper and lower teeth close together
- Tongue behind the teeth
GK → gk
Used for G and K-type sounds.
The mouth should have:
- Medium opening
- Slightly rounded lips
- Upper teeth visible
- Back of the tongue raised
Important: the supplied mouth reference image labels this shape QK, but Unity Face Animation V2 internally calls this viseme GK.
For automatic mapping, name the blendshape:
gk
L → l
The mouth should have:
- Jaw moderately open
- Upper teeth visible
- Tongue tip raised behind the upper front teeth
BMP → bmp
Used for B, M and P.
The mouth should have:
- Lips completely closed
- Jaw closed
- Teeth hidden
- Tongue relaxed
FV → fv
Used for F and V.
The mouth should have:
- Jaw nearly closed
- Upper teeth resting against or very close to the lower lip
- Lower lip pulled slightly inward
EE → ee
Used for strong E / EE sounds.
The mouth should have:
- Corners pulled wide
- Upper teeth clearly visible
- Lower teeth slightly visible
- Tongue high and forward
U → u
Used for U / OO-type sounds.
The mouth should have:
- Lips pushed forward
- Rounded lips
- A small but visible opening
- Teeth mostly hidden
- Tongue pulled back
REST
You do not need a separate Rest blendshape.
Rest means that all of the active lip-sync blendshapes are returned to 0.
4. Keep Every Export Identical
This is extremely important.
Every facial-expression file must come from the same exact character.
Do not change:
- Character proportions
- Clothes
- Hair
- Mesh topology
- Vertex count
- Vertex order
- Export settings
Only change the facial expression.
If the topology changes, the compiler cannot turn the expression into a blendshape.
Keep .mtl files and texture images beside the OBJ files.
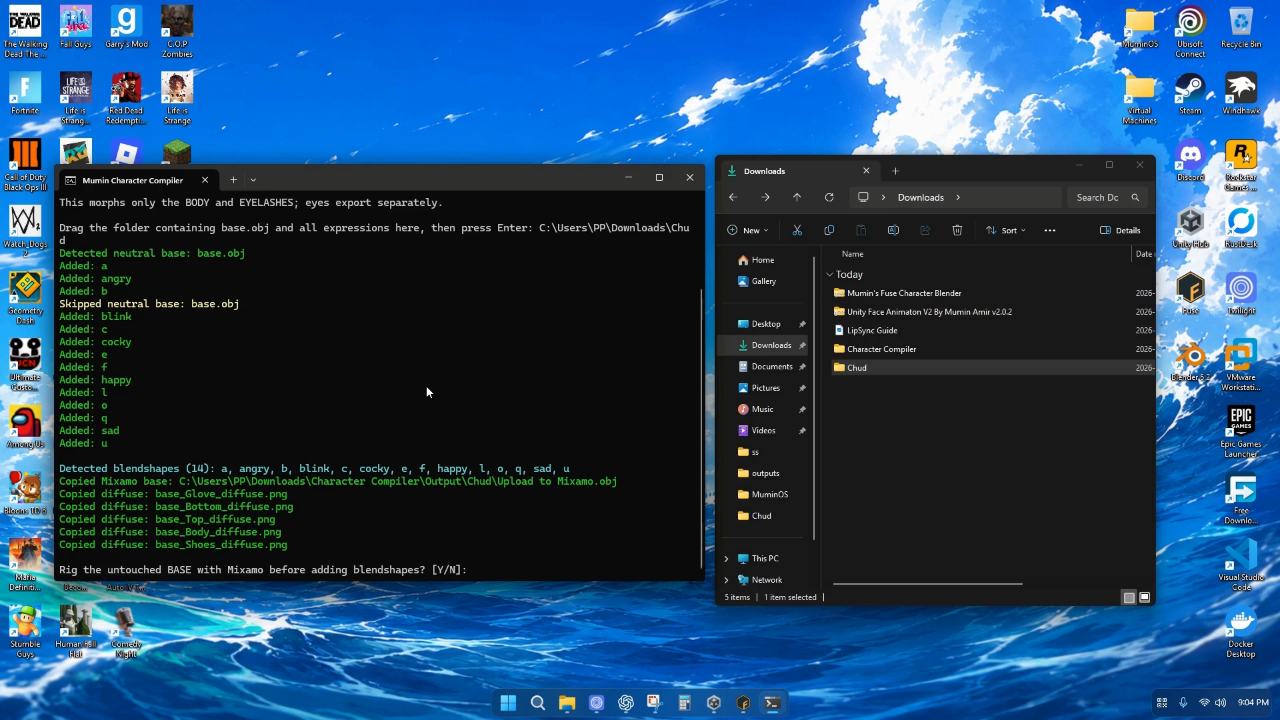
5. Run Mumin Character Compiler
Extract:
Mumin's Fuse Character Blender.zip
Open the extracted folder and run:
MUMIN_CHARACTER_COMPILER.bat
The compiler searches for Blender automatically.
It can detect:
- A portable Blender included with the compiler
- Normal Blender installations
- Steam Blender installations
- Blender from PATH
- A previously selected Blender
If Blender cannot be found, the program will ask you to drag:
blender.exe
into the command window.
You only need to do this once because the selected Blender location is remembered.
Compile the Character
When asked for your character folder:
- Drag the folder containing
base.objand all expressions into the window. - Press Enter.
- The program finds the neutral base automatically.
- It detects all expression files.
- It uses their filenames as blendshape names.
You will then be asked whether you want to rig the character with Mixamo.
Choose:
Y
for the recommended workflow.
6. Rig the Character With Mixamo
The compiler prepares an untouched neutral character for Mixamo.
It will open Mixamo and show you which base file to upload.
Upload the neutral character.
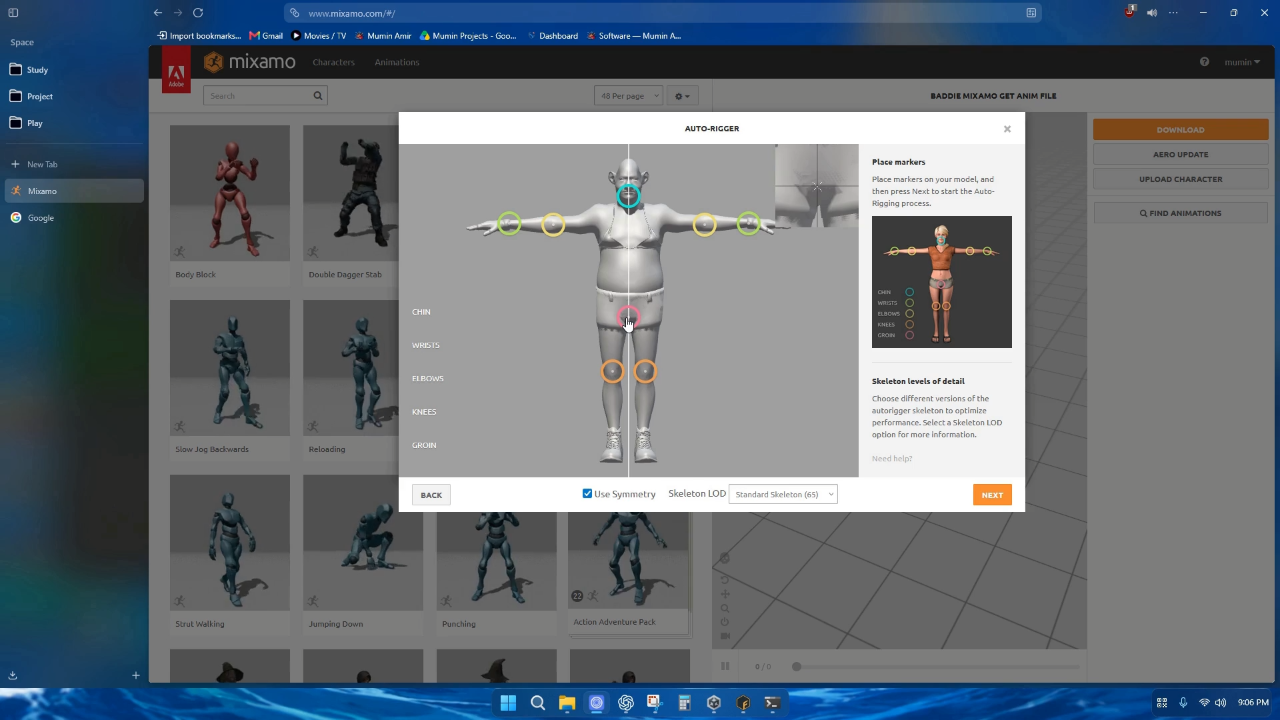
In Mixamo:
- Upload the character.
- Place the Mixamo rigging markers.
- Finish Auto-Rigging.
- Download the character using:
Format: FBX Binary Pose: T-Pose Skin: With Skin
The most important setting is:
With Skin
Do not download an Idle, Walking or other animation as the character file.
You need the actual rigged character in T-pose.
Return to Mumin Character Compiler.
Drag the downloaded Mixamo character FBX into the command window and press Enter.
The compiler validates the FBX before continuing.
It then combines:
- Mixamo skeleton
- Mixamo skin weights
- Your original character
- Lip-sync blendshapes
- Emotion blendshapes
- Materials
- Eyes
into the finished FBX.
7. Character Compiler Output
The finished files appear inside:
Character Compiler/Output/
For a character folder named:
John
you will get a folder similar to:
Output/John/
The main finished character will be:
John.fbx
You may also get:
John Mixamo Get Anim File.fbx
and copied character textures.
Use:
John.fbx
as the actual character in Unity.
The compiler also separates the eyes into:
LeftEye RightEye
This is important because the eye-tracking system can rotate each eye independently.
The eyes follow the Mixamo head while still being independently rotatable.
8. Install Mumin Face Animation V2 in Unity
Extract:
Unity Face Animation V2 By Mumin Amir v2.0.2.zip
Inside the package are:
Assets/Editor Assets/Runtime
Copy both folders into your Unity project's:
Assets/
Keep the included .meta files.
Wait for Unity to finish compiling.
You should now have a new menu:
Tools └── Mumin Face Animation V2 └── Mumin Lip Sync
9. Import Your Character Into Unity
Drag your finished character FBX and textures into the Unity Project window.
Example:
John.fbx
Drag the character into your scene.
Find the character's Body object.
The Body should contain a:
SkinnedMeshRenderer
Open its BlendShapes section.
You should see your expressions, such as:
aei o cde gk l bmp fv ee u blinkBody happyBody ...
Move the sliders manually to make sure every expression works before continuing.
10. Set Up the Character Rig
If you want Mixamo animations, decide whether you want to use Generic or Humanoid.
Humanoid
Select the character FBX.
Open:
Inspector → Rig
Set:
Animation Type: Humanoid
Click:
Apply
Make sure Unity creates a valid Avatar.
Do the same thing for every Mixamo animation FBX.
Character:
Humanoid
Animations:
Humanoid
Generic
You can instead leave both the character and animations as Generic.
The important rule is to keep the setup consistent.
The Character Compiler preserves Mixamo's expected skeleton root, so Generic Mixamo animation paths can bind directly.
11. Create Lip-Sync Data
Open:
Tools → Mumin Face Animation V2 → Mumin Lip Sync
Click:
New Data Asset
Choose where to save it.
For example:
Assets/Dialog/John_Line01.asset
Each dialogue line can have its own Lip Sync Data asset.
12. Add the Voice Audio
Drag your voice recording into Unity.
Then drag the imported AudioClip into the audio field at the top of the Mumin Lip Sync window.
The Lip Sync Data now contains the voice line that will be analyzed and played.
13. Select the Character's Face
In the Mumin Lip Sync window, find:
Blendshape Source
Drag the character's Body SkinnedMeshRenderer into this field.
You can also select the Body object in Unity and press:
Use Selected
The window will display all blendshapes found on the mesh.
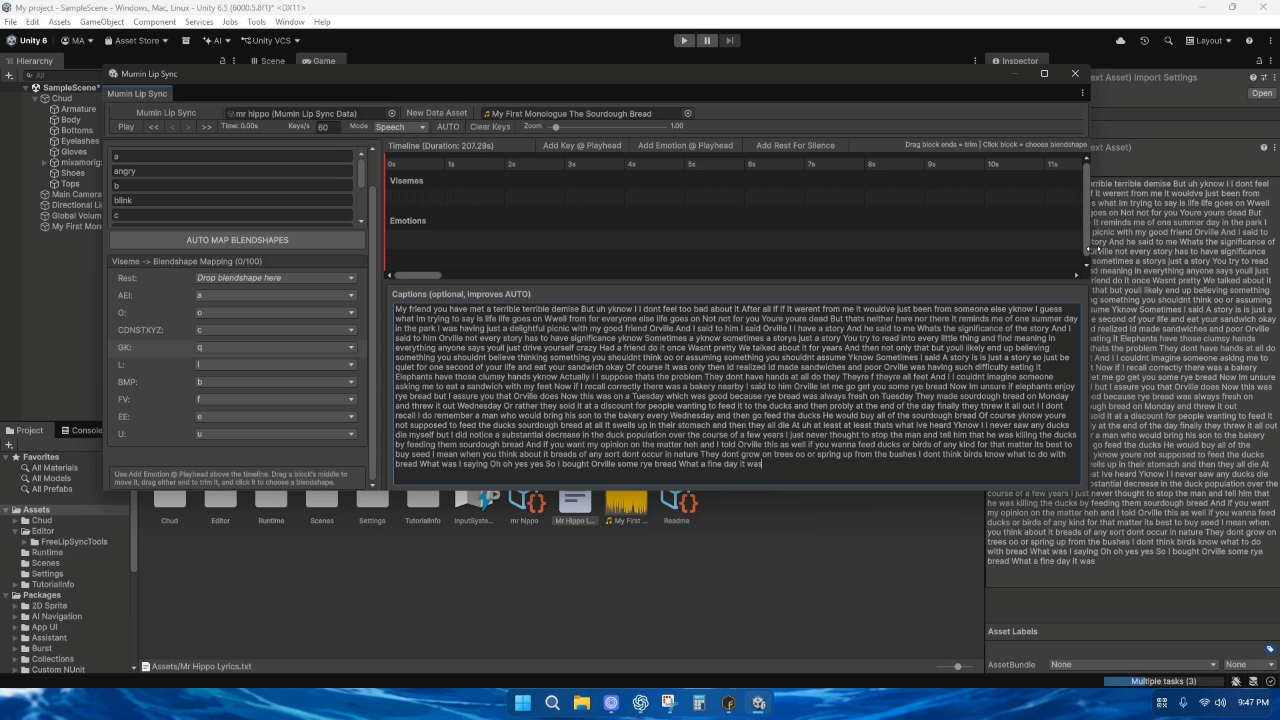
14. Automatically Map the Mouth Shapes
Press:
AUTO MAP BLENDSHAPES
For the recommended names, the mapping should become:
Rest
None
AEI
O
CDNSTXYZ
GK
L
BMP
FV
EE
U
| Blendshape |
|---|
| aei |
| o |
| cde |
| gk |
| l |
| bmp |
| fv |
| ee |
| u |
If your character uses different names, you do not have to rename everything.
You can:
- Click a blendshape slot and select the correct shape
- Or drag a blendshape from the Blendshape list directly into the slot
Again, if your reference sheet says QK, map that mouth pose to Unity's:
GK
slot.
15. Add the Transcript
At the bottom of the Lip Sync window is:
Captions (optional, improves AUTO)
Paste the exact words being spoken into this field.
For example:
Hey, where have you been? I've been looking everywhere for you.
The transcript is optional, but an accurate transcript helps the system identify difficult consonants and improves the generated mouth movements.
You do not need timestamps.
Just paste what is being said.
16. Generate Automatic Lip Sync
For normal dialogue, set:
Mode: Speech Keys/s: 24
Then press:
AUTO
The program analyzes the audio and creates mouth cues across the timeline automatically.
The bundled high-accuracy recognition system runs locally.
Your voice recording and transcript do not need to be uploaded to an external speech-recognition service.
When processing finishes, the generated mouth poses appear on the timeline.
17. Singing Mode
If the audio contains singing instead of normal speech, change:
Mode: Singing
Then press:
AUTO
Singing mode uses the detected speech/phoneme timing but performs additional handling for sustained vowel sounds.
For normal conversations, keep:
Speech
18. Preview the Lip Sync
Press:
Play
inside the Mumin Lip Sync window.
You can preview:
- Audio
- Mouth movements
- Emotions
- Timing
Use:
< >
to jump between mouth keys.
Use:
<<
to return to the beginning.
Use:
>>
to jump to the end.
Use the Zoom slider when making detailed corrections.
19. Fix Incorrect Mouth Shapes Manually
AUTO gives you the starting animation, but every generated key can still be edited.
To change a mouth pose:
- Click the mouth key on the timeline.
- Select the correct viseme.
To delete a mouth key:
- Right-click the key.
To create another key:
- Move the playhead where you want it.
- Click:
Add Key @ Playhead
You can then select the correct mouth shape.
20. Fix the Mouth During Silence
The system creates Rest poses during detected silence.
If you notice the mouth remaining open during pauses, use:
Add Rest For Silence
This adds additional Rest keys where the audio is detected as silent.
Remember that Rest is not a separate facial expression.
A Rest key resets the mapped lip-sync blendshapes back to zero.
21. Add Facial Emotions
Any other facial blendshape can be animated alongside the lip sync.
Examples:
happyBody sadBody angryBody worriedBody surprisedBody
Move the playhead to where the expression should begin.
Click:
Add Emotion @ Playhead
An emotion block appears on the Emotion track.
Click the block and choose the facial blendshape.
You can also change its weight.
Example:
happyBody Weight: 70
Editing Emotion Blocks
Drag the middle of a block to move it.
Drag the left edge to change when the expression begins.
Drag the right edge to change when it ends.
This allows the same Lip Sync Data asset to control both the speech and facial expression for a dialogue line.
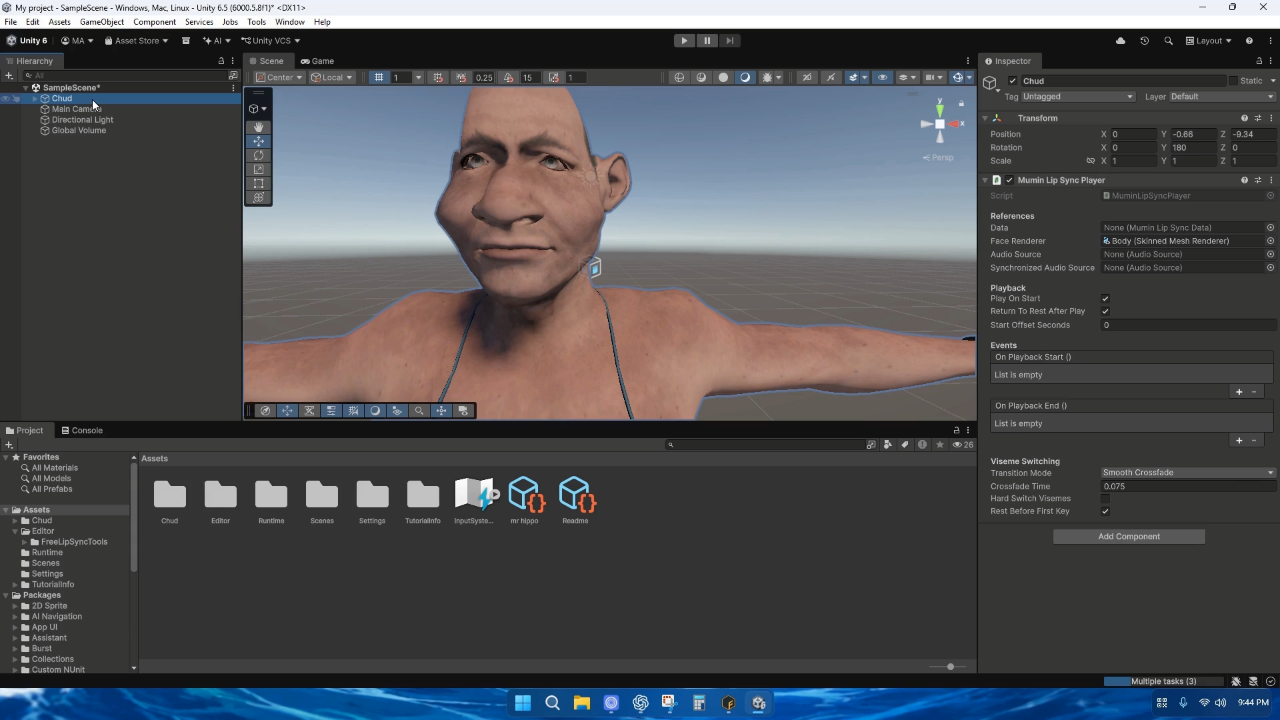
22. Add the Runtime Lip-Sync Component
Select the character in your scene.
Add Component:
Mumin Lip Sync Player
Assign:
Data
Drag your:
MuminLipSyncData
asset here.
Face Renderer
Drag the character's Body:
SkinnedMeshRenderer
here.
Audio Source
Assign an AudioSource.
The component can automatically create/find one, but assigning it directly makes the setup easier to understand.
23. Recommended Lip-Sync Player Settings
For most characters use:
Play On Start: ON Return To Rest After Play: ON Transition Mode: Smooth Crossfade Crossfade Time: 0.075 Rest Before First Key: ON
Return To Rest After Play is especially useful.
When the dialogue finishes, all mapped lip-sync blendshapes return to zero instead of leaving the character stuck with its mouth open.
24. Triggering Dialogue Manually
If you do not want the character to speak immediately when the scene starts, disable:
Play On Start
You can then trigger the Lip Sync Player's:
Play()
function from your game, cutscene, dialogue system or UnityEvent.
The component also provides playback start and playback end events for connecting other gameplay logic.
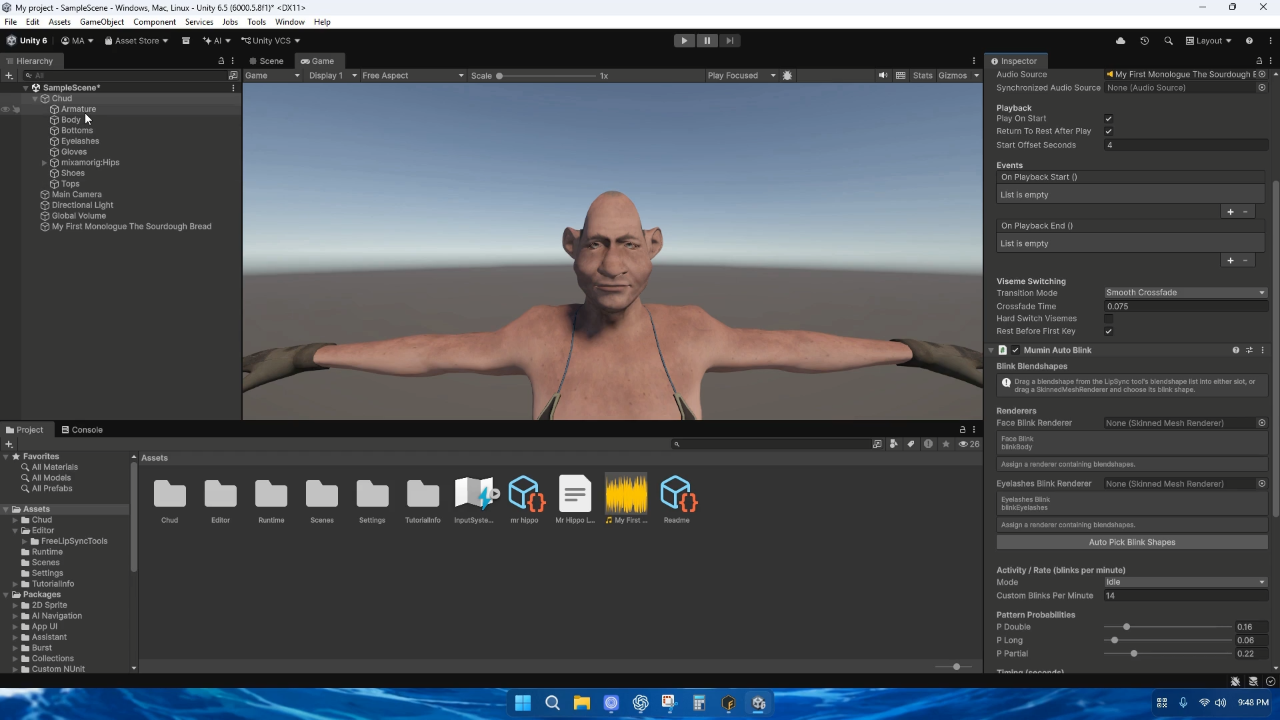
25. Set Up Automatic Blinking
Select the character.
Add Component:
Mumin Auto Blink
Assign the character's Body SkinnedMeshRenderer to:
Face Renderer
If the eyelashes also have their own blink blendshape, assign their renderer to:
Lashes Renderer
Then click:
Auto Pick Blink Shapes
The component automatically searches for blendshapes containing names such as:
blink
If it chooses the wrong one, manually select the correct blendshape.
You can also drag a blendshape directly from the Mumin Lip Sync window into the blink slot.
26. Blink Modes
The Auto Blink component includes several behavior modes:
Idle Conversation Reading Custom
Idle
Normal general-purpose blinking.
Conversation
Slightly more frequent blinking for a character who is talking or interacting.
Reading
Less frequent blinking.
Custom
Allows you to specify your own blink frequency.
The system also automatically varies things such as:
- Blink timing
- Partial blinks
- Double blinks
- Long blinks
- Closing speed
- Opening speed
This prevents the eyes from blinking at an obviously fixed robotic interval.
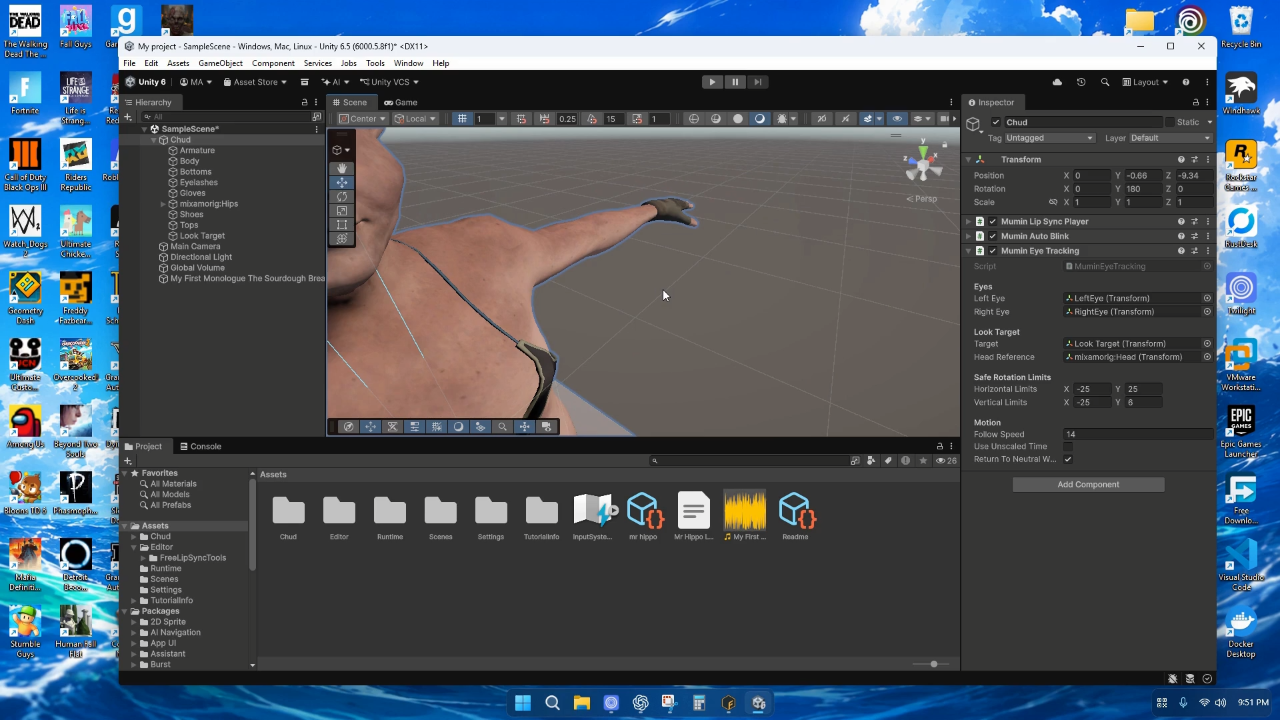
27. Set Up Eye Tracking
The Character Compiler separates the eyes into:
LeftEye RightEye
Select your character and add:
Mumin Eye Tracking
Assign:
Left Eye → LeftEye Right Eye → RightEye
Next, create or choose an object for the character to look toward.
For example:
GameObject └── LookTarget
Drag it into:
Target
The character's eyes will now follow that object's position.
28. Set the Head Reference
Find your Mixamo head bone.
Usually the hierarchy contains something similar to:
mixamorig:Hips └── ... └── mixamorig:Head
Drag:
mixamorig:Head
into:
Head Reference
This allows the system to calculate eye limits relative to the direction the character's head is facing.
29. Recommended Eye Settings
The default settings are a good starting point:
Horizontal Limits: -25 to 25 Vertical Limits: -25 to 6 Follow Speed: 14
Do not give the eyes extremely large rotation limits.
Real eyes have limited movement, and large values can make the character look unnatural.
30. Make the Character Look at the Player
A simple method is to use the player's camera as the target.
For example:
Main Camera
can be assigned directly as the Look Target.
For cutscenes, it is usually better to create an invisible:
LookTarget
GameObject.
You can then animate or move that GameObject between:
- Another character's face
- The camera
- An object
- A doorway
- Any point of interest
The character's eyes automatically follow it.
31. Fix Incorrect Eye Orientation
Before entering Play Mode, make sure both eyes are facing forward normally.
The Eye Tracking component automatically remembers their neutral local rotations.
If necessary, use:
Capture Current Rotations As Neutral
after correcting the eyes.
Then let the script rotate away from that neutral position during gameplay.
32. Add Mixamo Body Animations
Download your desired animations from Mixamo.
Examples:
Idle Walking Talking Sitting Running
Import them into Unity.
If your character uses Humanoid:
Character → Humanoid Animation → Humanoid
If using Generic:
Character → Generic Animation → Generic
Create an Animator Controller.
Expand the animation FBX in Unity.
You will see the actual animation clip underneath it.
Drag that animation clip into your Animator Controller.
Do not drag the model GameObject itself into the Animator state.
33. Complete Character Setup
A fully configured character may now contain:
Character ├── Animator ├── Mumin Lip Sync Player ├── Mumin Auto Blink ├── Mumin Eye Tracking │ ├── Mixamo Skeleton │ └── Head │ ├── Body │ └── SkinnedMeshRenderer + BlendShapes │ ├── Eyelashes │ └── Optional Blink BlendShape │ ├── LeftEye └── RightEye
The systems can all run at the same time.
The character can:
- Perform a Mixamo body animation
- Speak automatically
- Change facial expressions
- Blink naturally
- Follow a target with its eyes
34. Troubleshooting
AUTO MAP does not find my mouth shapes
Make sure Blendshape Source is assigned to the character's Body SkinnedMeshRenderer.
Recommended names are:
aei o cde gk l bmp fv ee u
Otherwise manually drag the correct shapes into their slots.
My QK blendshape is not automatically detected
Unity Face Animation V2 calls this viseme:
GK
The automatic mapper searches for names such as:
gk g k
Rename the blendshape to:
gk
or manually assign your QK expression to the GK slot.
My mouth stays open after talking
Make sure:
Return To Rest After Play
is enabled on Mumin Lip Sync Player.
You can also use:
Add Rest For Silence
in the editor if the problem happens during silent sections of the recording.
The mouth does not move
Check:
- Mumin Lip Sync Player has a Data asset.
- The Data asset has an AudioClip.
- Face Renderer is the correct Body SkinnedMeshRenderer.
- The viseme mappings point to real blendshape names.
- The Lip Sync Data contains generated timeline keys.
Blendshapes are missing after compilation
Make sure every expression:
- Came from the exact same character
- Used identical export settings
- Has identical topology
- Has identical vertex count
- Has identical vertex order
Do not change the character mesh between expression exports.
Mixamo character is rejected by the compiler
You probably dragged an animation-only FBX into the compiler.
Return to Mixamo and download the actual character using:
FBX Binary T-Pose With Skin
Then drag that FBX into the compiler.
Mixamo animation does not play correctly
Make sure:
- Character and animation use compatible Rig settings
- Both are Humanoid if using Humanoid
- Both are Generic if using Generic
- You added the animation clip to the Animator Controller rather than the model GameObject
Blink does nothing
Check that:
Face Renderer
points to the correct SkinnedMeshRenderer.
Then press:
Auto Pick Blink Shapes
If that fails, manually select your blink blendshape.
Eyes do not follow the target
Make sure all four fields are correctly configured:
Left Eye Right Eye Target Head Reference
Also confirm that LeftEye and RightEye are actual separate eye transforms.
Eyes rotate too far
Reduce:
Horizontal Limits Vertical Limits
A good starting point is:
Horizontal: -25 / 25 Vertical: -25 / 6
35. Quick Setup Version
If you already understand the process, the complete workflow is:
1. Install Blender. 2. Create: base.obj aei.obj o.obj cde.obj gk.obj l.obj bmp.obj fv.obj ee.obj u.obj + optional blink/emotion expressions. 3. Run MUMIN_CHARACTER_COMPILER.bat. 4. Drag the character folder into it. 5. Choose Y for Mixamo. 6. Upload the untouched base to Mixamo. 7. Download: FBX Binary T-Pose With Skin 8. Drag the downloaded character FBX back into the compiler. 9. Import the finished CharacterName.fbx into Unity. 10. Copy Unity Face Animation V2's Editor and Runtime folders into Assets. 11. Open: Tools → Mumin Face Animation V2 → Mumin Lip Sync 12. Create a new Data Asset. 13. Add voice AudioClip. 14. Set Body as Blendshape Source. 15. Press AUTO MAP BLENDSHAPES. 16. Paste the dialogue transcript. 17. Mode = Speech. Keys/s = 24. 18. Press AUTO. 19. Add Mumin Lip Sync Player to the character. 20. Assign: Data Body Renderer Audio Source 21. Add Mumin Auto Blink. 22. Assign Body/Eyelashes and press Auto Pick Blink Shapes. 23. Add Mumin Eye Tracking. 24. Assign: LeftEye RightEye Look Target Head bone 25. Press Play.
Your character is now ready to talk, blink, use facial expressions, look around, and play normal Mixamo animations in Unity.
Download
Click download now to get access to the following files:
Leave a comment
Log in with itch.io to leave a comment.